Overview
PowerDMARC's MCP (Model Context Protocol) server lets you connect your PowerDMARC account to AI hosts such as Claude Desktop, Cursor, and Claude Code. Once connected, your AI assistant can access DMARC reports, DNS lookups, domain management tools, and more — directly from your AI environment, without switching between platforms.
PowerDMARC supports two connection methods: Standard Token and OAuth (Primary Token). Both can coexist on the same account — the right choice depends on your preferred authentication flow.
1. Create an API Token
Before connecting your AI host, you need to create an API token with MCP access enabled. This token authenticates your AI host and defines what data it can access.
Navigate to API Settings from the left-hand sidebar.
Click Add Token (or select an existing token to edit it).
Enter a Name for the token — use something descriptive, such as Claude Desktop or MCP Token.
Enable the MCP toggle. This activates MCP access for the token.
Under Permissions, select the data scopes your AI host should have access to:

Click Save.
Your token is now ready to use with the MCP server.
2. Choose Your Connection Method
PowerDMARC supports two ways to connect an AI host to the MCP server. Review the comparison below and follow the steps for your preferred method.
2.1 Standard Token
Use this method if you want a straightforward token-based connection. Any API token with the MCP toggle enabled will generate a standard MCP Server URL.
In API Settings, open the token you created in Section 1.
Confirm that the MCP toggle is enabled and the Primary API Token toggle is off.
Navigate to MCP in the left-hand sidebar.
Select your token from the MCP Token dropdown.
Copy the MCP Server URL displayed on the page. Use this URL when configuring your AI host in Section 3.
2.2 OAuth Flow (Primary Token)
Use this method if your setup requires OAuth-based authentication. Enabling the Primary API Token toggle on a token generates a separate OAuth MCP Server URL.
In API Settings, open the token you want to use as your primary token.
Ensure the MCP toggle is enabled.
Enable the Primary API Token toggle.
Click Save.
Navigate to MCP in the left-hand sidebar.
Select your primary token from the MCP Token dropdown. An OAuth-specific MCP Server URL is generated this is different from the standard URL.
Copy the OAuth MCP Server URL. Use this URL when configuring your AI host in Section 3.
3. Install the MCP Server
Once your token is created, navigate to MCP from the left-hand sidebar to access the installation page.
Select your token from the MCP Token dropdown. If you need to review or update your token settings, click Manage token to return to API Settings.
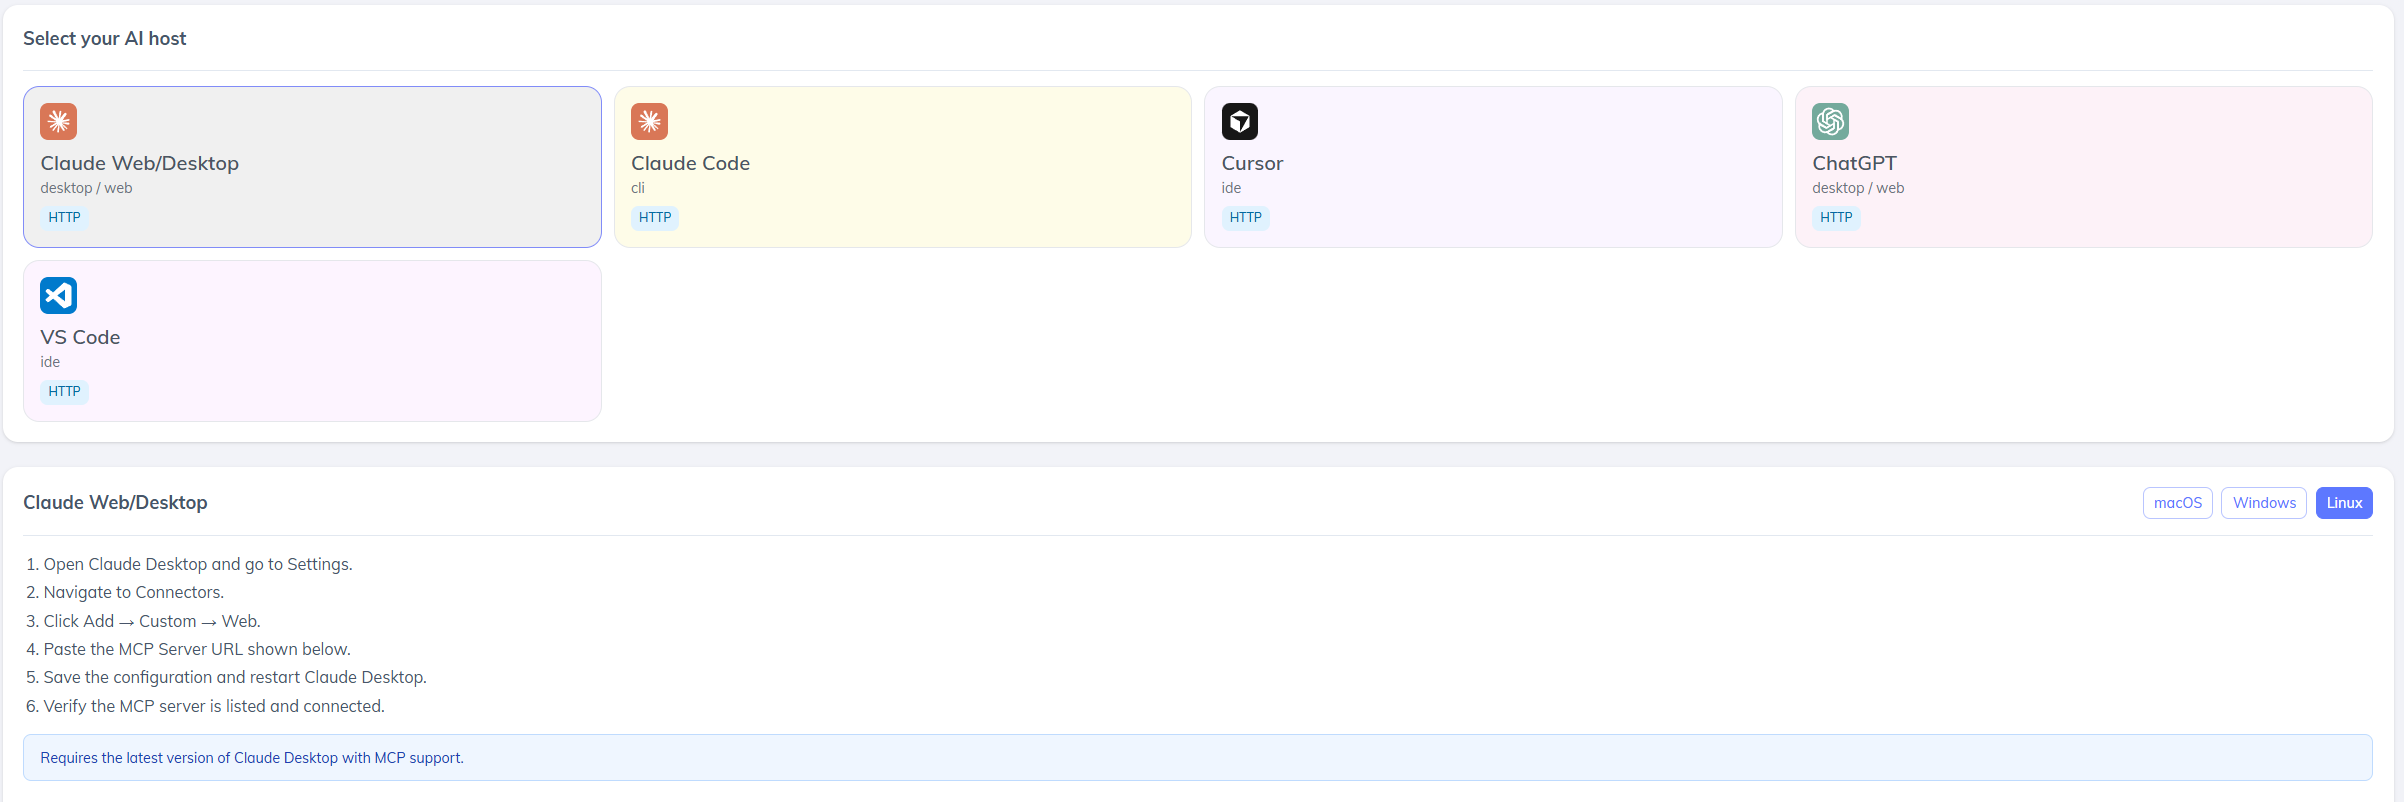
Under Select your AI host, choose the environment you want to connect:
After selecting your AI host, the page displays the platform-specific setup steps. Follow the instructions for your chosen host below.
3.1 Claude Desktop
Switch between macOS, Windows, and Linux using the OS selector in the top-right of the setup panel.
Open Claude Desktop and go to Settings.
Navigate to Connectors.
Click Add → Custom → Web.
Paste the MCP Server URL displayed on the PowerDMARC MCP page.
Save the configuration and restart Claude Desktop.
Verify the MCP server is listed and shows as connected.
3.2 Cursor
Open Cursor and navigate to Settings → MCP.
Click Add MCP Server.
Paste the MCP Server URL displayed on the PowerDMARC MCP page.
Save and restart Cursor.
Verify the PowerDMARC server appears in your active MCP connections.
3.3 Claude Code
Open your terminal.
Run the setup command shown on the PowerDMARC MCP page, which includes your MCP Server URL.
Verify the connection by running a test prompt in Claude Code that references your PowerDMARC data.
3.4 Chatgpt
Switch between macOS, Windows, and Linux using the OS selector in the top-right of the setup panel.
Open ChatGPT Desktop and go to Settings.
Navigate to Connectors or MCP Servers.
Add a new server and paste the MCP Server URL copied from Section 2.
Save the configuration and restart ChatGPT.
Verify the PowerDMARC MCP server is listed and active.
3.4 VS Code
VS Code uses a JSON configuration file to register MCP servers. The setup panel on the PowerDMARC MCP page provides a pre-filled configuration block you can copy directly.
Switch between macOS, Windows, and Linux using the OS selector in the top-right of the setup panel.
Create or open the file .vscode/mcp.json in your workspace.
Copy the MCP configuration block from the PowerDMARC MCP page using the Copy button.
Paste the configuration into .vscode/mcp.json and save the file.
Restart VS Code. If the MCP server does not appear immediately, reload the window.
4. Monitor Usage
The MCP page displays live usage counters at the top of the screen:
Use these counters to confirm that your AI host is successfully connecting and making calls to the PowerDMARC MCP server.
5. Access Control
The MCP feature is available to specific PowerDMARC account types. Access is controlled through API token permissions — the AI host can only access data covered by the permissions enabled on the token used to connect.
To revoke access at any time, navigate to API Settings, open the token, and either disable the MCP toggle or delete the token entirely.
For further assistance, visit support.powerdmarc.com or contact your PowerDMARC account manager.